Quinoa Stuffed Peppers

Quinoa Stuffed Peppers

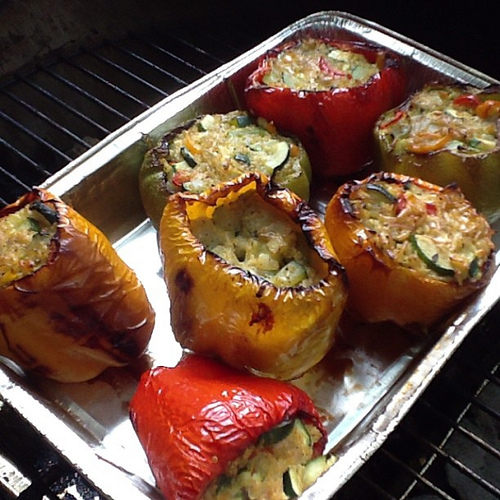
We’ve grilled several batches of stuffed peppers this Summer, but these were my favorites. I grilled the peppers for a bit to soften them up, then my wife stuffed them with a combination of quinoa and sauteed zucchini with other delightful veggies before we put them back on the grill to warm. I’m honestly not sure what all she put into them. I almost grilled them too long prior to stuffing, so we had to be careful not to tear the flesh before we were ready to serve them.

St. Louis Style Ribs

St. Louis Style Ribs

Messy to eat and a lot of work to cook, ribs are what many people think of first when you mention the word “barbecue.” The ability to turn out competition quality ribs is what separates the serious outdoor cook from the dabbler. It requires the use of a multitude of techniques, along with precision in timing and temperature control from start to finish during an all-day process. When done correctly, the result is a complex of flavors and texture that cannot be found in any other dish.

I have to admit that I have never been a huge fan of ribs. They’re like longhair music to me. I appreciate the artistry, but they’re just too much bother. I’d rather listen to light Chamber Music or Showtunes, and I’d rather eat pulled pork.

Still, the lure of developing the high-specific skills necessary to prepare the dish was too much for me, so I had to give them a try.

I won’t claim that they were the best ribs I’ve ever tasted, but they were certainly in the hunt. The meat came off the bone fairly easily, but it didn’t “fall off.” To me, this is the perfect doneness for ribs (although my wife would have preferred them more done). They were the rib equivalent of “al dente” pasta – tender and yielding to the tooth rather than overdone mush.

As to the flavor, that would be hard to top as well. As you can see from the photo above, there was a nice smoke penetration. They were well-seasoned (even unsauced), although I would use more rub next time and likely add some mustard before the rub to help create a denser bark.

We served these with a delicious cole slaw that my wife made, roasted garlic bread from Grammy, and some Texas Baked Beans that I made on the grill (my wife’s Aunt Nancy’s recipe).

What would I change? Not much. Other than the change with the rub mentioned above, I might leave them to braise a few minutes longer next time. I also might try my hand at making my own sauce.

I doubt that these ribs would win any medals, but I wouldn’t be ashamed to serve them to the champs. Not only that, the process itself was a pleasure. It’s hard to beat a cool, bright day spent with the sound of the Allman Brothers Band and the smell of Cherry wood drifting over the patio.

racks-of-ribs

My Plan For Ribs

Many, many years ago, I used to cook on a water smoker. It was a Brinkman Sportsman model, if memory serves. In addition to smoked salmon (caught on fishing trips to Lake Michigan), I liked to smoke a ham and a turkey on it for New Year’s Eve. The ham would go on the top rack, and its drippings would baste the turkey on the lower rack.

Since my wife is not a huge fan of smoked foods (nor of the smell of the smoking process) I haven’t replaced the smoker, which I abandoned in a move for various reasons more than a decade ago. Although either a Komado style ceramic smoker or a Weber Smokey Mountain is on my short list for future barbecue equipment purchases, since I decided to smoke some St. Louis Rib racks this weekend, I’ll have to cook them on my trusty Weber Kettle.

Here are the challenges.

1) I have no experience with the cut of meat. Other than the advice people give to cook them “low and slow” there are a lot of other parts of the process that seem shrouded in mystery, including “secret rub” recipes, methods with names like “minion” and “3/2/1” – and almost too many recipes and techniques out there to fathom. Should I slather the ribs with mustard before putting on the rub? Should I mop them, or not? Researching and sorting through the volumes of information on how to cook “championship” ribs has occupied most of my non-work waking hours for nearly two weeks.

2) By far, it looks like the biggest challenge will be that of controlling the heat on my Kettle to keep it in the 225 to 250 degree range, which most folks seem to agree is essential to cooking tender, mouth watering ribs. A water smoker would make this easier, but I’ll have to make do.

Here’s the plan.

1) I settled on a rub recipe based on dozens or so that I found in research. It includes paprika, black pepper, cumin, onion powder, garlic powder, nutmeg, turbinado sugar and a little cayenne. I’ll salt the ribs and let them rest awhile before rubbing. I also may put some brown mustard on them to add flavor and help to adhere the rub.

2) I’ll spray the racks every hour or thereabouts with a combination of port wine and apple cider vinegar.

3) The grill setup will be a pile of charcoal on each side, with a drip pan full of water in the middle. I’ll start with four lit coals on each side, and let them ignite the others throughout the five or six hour cook time. This is the “minion” method mentioned above. I’ll also have to close the vents on the bottom of the kettle most of the way in order to slow the flow of oxygen to the fuel and keep the temperature low. Cherry wood chunks will provide the smoke, and I have a simple (analog) thermometer that I can place in a vent hole on the top of the kettle to monitor the temp. I figured that using the old style thermometer would help keep me from constantly fidgeting and tweaking over two-tenths of a degree here or there.

4) After three hours of cooking, I’ll get the ribs into some foil with a little dribble of the mop sauce and let them mostly finish cooking that way. I’ll take them back out and sauce them (with Sweet Baby Ray’s, of course) for the last 30 minutes or hour of cooking. Our friend, Ken, who turns out the tastiest rib tips I’ve ever eaten, says that I should put some chopped onions in the coals toward the end to help flavor the meat as well.

If it all goes well, Sunday dinner this week ought to be grand. We’ll have baked beans, slaw, and roastin’ ears as sides, and I suspect that I’ll be consuming a bit of a certain beverage brewed with hops.

I’ll likely be posting pictures of the process over on Instagram and Flickr, and will definitely have a full update here after we see how they turn out.

Wish me luck!

How To Make Pizza On The Grill

pizza-on-the-grill

There’s truly nothing much tastier than pizza that’s been cooked on a grill, and there’s also nothing much simpler to prepare that can yield such a variety of styles and flavors. I first made pizza on a grill a couple years ago. It was fine, but honestly, the process was pretty arduous. After further research and a lot of trial (and error) I think I’ve found a foolproof process for turning out consistently outstanding pizza.

Choose your dough wisely. My early efforts at pizza on the grill involved boxed dough mixes. They work, but there was a lot of time and effort involved, and the results weren’t as tasty or as crunchy as I’d have liked.

I would recommend that you get friendly with the folks at a local pizzeria, and see if they’ll sell you a big ball of dough. If you’re a good customer and explain what you’re wanting to do with it, chances are you may even end up with enough dough for several grilled pizzas for free. At least, that’s what happened to me.

I would also highly recommend the basic pizza dough recipe from the authors of Artisan Bread in 5 Minutes a Day. Once you learn their method, you can mix up a batch in just a few minutes with very little effort. The dough will make five or six nice sized pizzas and will keep in the refrigerator for a couple weeks if you’re not doing them all at one time.

Use Parchment Paper! Initially I tried putting my dough on a pizza peel and sliding it off onto the grill, but I found that with thinner crusts this method results in a glommy mess instead of a nice crust. Nowadays (since my wife prefers thin crust) I stretch or roll my dough out on a sheet of parchment paper. It’s relatively easy to get it upside down on the grill with the dough still in decent shape. After thirty seconds or so, the paper peels right off, leaving you with a tidy crust.

Pre-cook whatever needs it. The simplest way to cook pizza on a grill involves baking the dough, then topping it, and then returning it to the grill to finish. You won’t want to overcook the crust, so any toppings that need much cooking should be mostly done ahead of time. Uncooked meats or any other toppings that you wouldn’t want to eat raw (onions, in my case) should be done to the point that they can be finished with indirect heat in two or three minutes.

Having mentioned all of that, here’s my step-by-step process when it’s time to grill.

Step 1: Stretch your dough. I get a ball of dough a little bigger than a softball and let it rest at room temperature for a bit. I flour the parchment paper, set on the dough ball and flour it. I like to use a French Rolling Pin to flatten out my dough, but some people have luck simply stretching it out from the center with their fingertips, or even (God help us) tossing it in the air to stretch. This looks like fun, but I’ll leave it to more adventurous souls than me. I find that I can get the dough to an even 1/8″ thickness that is nearly round by using the pin.

Step 2: Oil it. I use a blast or two of spray oil on the top on my dough once I have it rolled out on the parchment. Either olive or canola has worked fine for me. I think the olive may add a little more flavor. The lower smoke point doesn’t matter, because you’ll be watching the bake pretty closely anyway. Just don’t oversaturate the dough with oil. A little bit does the trick.

Step 3: Have your grill hot. I’ll preheat my grill on high for about ten minutes before I’m ready to start cooking, clean the grates with a wire brush, and then back the heat down to medium/high. On my Weber Genesis, this means all three main burners on full during warm up, then turned down half way when it’s time to cook.

Step 4: Cook the top first. When you’re ready to put your dough on the grill, aim, “commit and flip” as they say. You don’t need a pizza stone or griddle or anything of the sort. Just get the dough down on the grill, directly over the heat, as quickly as you can and get the lid closed. About thirty seconds later, open the lid and use your tongs to tug gently at the edge of the parchment. If it pulls up easily remove it. If it’s being stubborn, close the lid for a little while longer and then try again. You’ll want to keep an eye on the crust as it bakes, checking every half-minute or minute. Use your tongs to lift up one of the edges. When the crust releases easily from the grill and you’re able to lift it with your tongs, rotate it about a quarter turn so that if there are any hot spots it cooks more evenly. Total cooking time on this side will likely be around 5 or 6 minutes. At this point you can flip the crust over, and let it cook a minute or two on the other side. Remove it from the grill after this. The side that you cooked first is the one where the toppings go.

Step 5: Finish it indirect. I usually cook several pizzas when I’m grilling them, and it works best for me to do one crust at a time, and then when they’re all finished, top them and cook each pizza on its own. So for this part, I turn off my middle burner, put the topped pizza in the center of the grill, and let convection warm everything up. The grill grates will remain hot enough to finish the bottom of the crust, but it’s less likely to get overly charred. Also, this method gives all of the gooey topping goodness time to melt together and finish cooking (if there’s any need for that). Five minutes is the longest I’ve needed to cook a pie at this final step, but it may take considerably less.

The pizza shown at the top of this post is a chicken and ranch dressing pizza we made a few weeks ago. It had a little thicker crust than I like to make now, but it was incredibly delicious. I left off the tomato sauce altogether and topped the pizza with shredded mozzarella cheese, diced tomatoes, cubed grilled chicken, ranch dressing and some seasonings (salt, pepper, oregano).

Really though, you can use just about anything for topping. My favorite is a pizza with a nice thin layer of sauce, some shredded Italian cheeses, and a rosemary-based seasoning that we usually use for olive oil dipping sauce. Hard to believe that something as simple as that can taste as good as it does.

Believe me, once you get this process down you’ll be hooked. In the time it would take for your order to arrive from one of those cardboard pizza chains, you can be feasting on a proper pie that will put their product to shame. All it takes is a grill, a little preparation and a box of parchment paper.

My Father’s Barbecue

Barbecue Ideas

In the backyard of the house my father built there was a brick barbecue grill. As I remember it, it sat on a concrete slab just back of the breezeway, and to my toddler eyes it looked like a huge red throne. There were concrete caps on each side of the hearth, with grill grates fashioned of rebar stretching between them. The grates were at eye level to me, and the chimney on the back was about as tall as my dad.

I’m certain that he built it with his own hands, perhaps with some help from one of his union brothers or a neighbor, but I don’t remember him ever cooking on it. After his passing, it was just another interesting thing for us to climb on, like the orchard trees he had planted, the tall iron swing set and the big metal septic tank.

Like so many other things about my father that I don’t remember and therefore had to conjure, the image of him tending the fire and food is all the more vivid to me.

That’s probably the main reason I so love to cook outdoors. Whether or not my father actually made much use of his fine brick barbecue grill, my ideal American backyard or patio wouldn’t be complete without a spot for flames, and a guy cooking there.

While I was growing up (after my father passed away), my family didn’t grill out much. I do remember occasional weenie roasts or cookouts at the homes of uncles and aunts, and my mother used a hibachi for cooking hamburgers once in awhile. My first recollection of truly awesome grilled or smoked food would be from the county fair, or the local apple and pork festival in a neighboring town.

My own outdoor cooking pursuits began in my early twenties with one of those cheap metal tripod grills you could buy at the hardware store for $3.99. It was essentially a round metal tray with legs and a small grill grate that fit on top. We would climb out the window of a friend’s apartment on to a flat section of roof with the grill, a bag of match light and some burgers or hot dogs, and half an hour later we’d be living the dream.

I soon graduated to a Weber Smokey Joe when the cheapo model fell apart, and I began to learn how to cook things other than burgers and dogs. My first full-sized Weber Kettle came not long after.

Thirty years later and my patio is still home to a vintage Weber Kettle, along with a Genesis gas grill we added this Summer and a portable fireplace for roasting marshmallows and such. Either a Komado style smoker or a Weber Smokey Mountain water smoker is yet to come, but every now and then I still dream of building my own custom brick grill and oven one of these days. My ideal would be something similar to the one pictured at the top of this post. The image was created for the cover of a book from Sunset titled Ideas for Building Barbecues which was first published in 1962. Yes, I do have a copy.

Or maybe my barbecue would be like the Chinese oven Trader Vic used to create all of those amazing Polynesian-inspired dishes for his restaurants. Or perhaps just a simple red brick and concrete hearth like my father’s.

I may never build it, but it’s nice to imagine.

For now, I’ll be tending my fires, be they fueled by gas, charcoal or wood. Each time I take tongs or spatula in hand, I’m a man from Kentucky with a toddler on his shoulders – in a backyard in Oreana, Illinois on a fine Summer day – a long, long time ago.